Katori Blouse Cutting
Previously, we have seen the crop top, princess cut blouse cutting & 4 tucks blouse cutting.
Today we will see katori blouse cutting.
Sleeve and back side cutting are done the same way as we have seen in previous blouses.
The only difference is the cutting on the front side.
Shoulder measurement depends on the length of the neck on the back side of every blouse cutting.
Boat-neck, collar-neck, or deep neck all have different shoulder and armhole measurements, which we have seen earlier.
We can do with or without yoke in tucks or princess cut blouses but here yoke is required in a Katori blouse.
Required Measurements For 4 Tucks Blouse Cutting:
Today we will learn how to do a princess cut with a deep back neck.
Here is the method to take body measurements.
- Length – measure from shoulder to waist
- Shoulder – measure from the back side from left to right covering the whole shoulder
- Upper Chest – measure from the upper part of the breast in a round
- Lower Chest – measure on the breast in a round
- Waist – measure the thinnest part of the waist and take measurements in round
- The sleeve-cutting method is the same for every garment.
Steps with figure:
- Now after taking the updated measurement take a sample of any measurement to know how much more fabric to cut for sewing.
- Length: 15″
- Shoulder: 15″
- Upper Chest: 36″
- Lowe Chest: 39″
- Waist: 32″
- Frontside Neck: 6″
- Backside Neck: 11″
- First of all, we will do paper cutting.
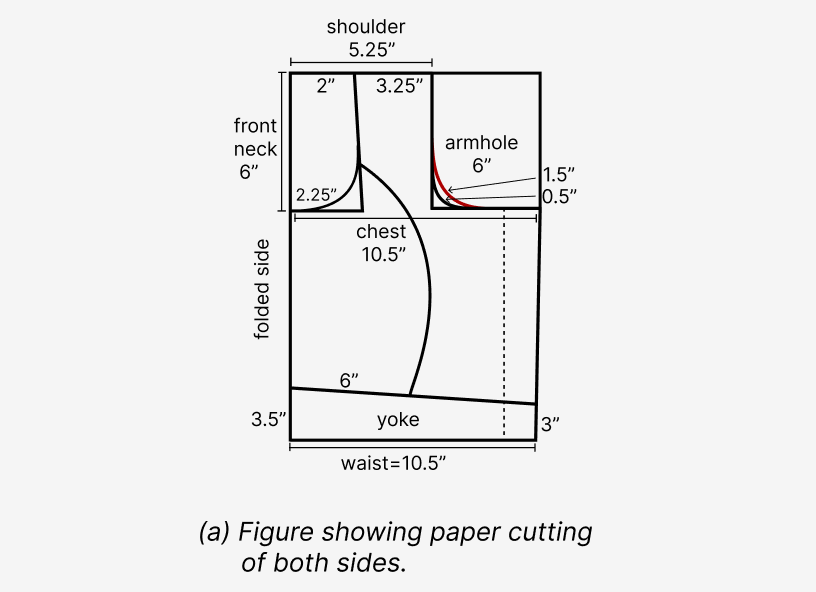
- The folded part of the paper is to be taken, in which both the front and back sides are cut together.
- In the folded paper, the bottom part becomes the back side and the front part becomes the katori, yoke, and side part.
- For the armhole curve, take 1.5″ from the back curve corner and take the front curve 0.5″ inside it, as drawn in figure(a).
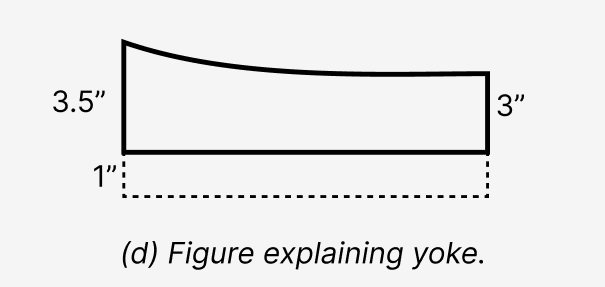
- As explained in below figure(a), the regular measurement of the yoke part is 3.5″–> 3″.
- Now draw a 6″ katori and a 3.5″–>3″ yoke on the folded side of the paper.
- The measurement of the katori and yoke depends on the measurement of the chest, as we will see in the table later.
- To draw the shape of the katori, take a point 4-4.5″ above the neck and draw a round shape where the width of the katori is 6″, as shown in figure(a).
- In this way how to take measurements for cutting from the body measurements is shown in the princess cut blouse.
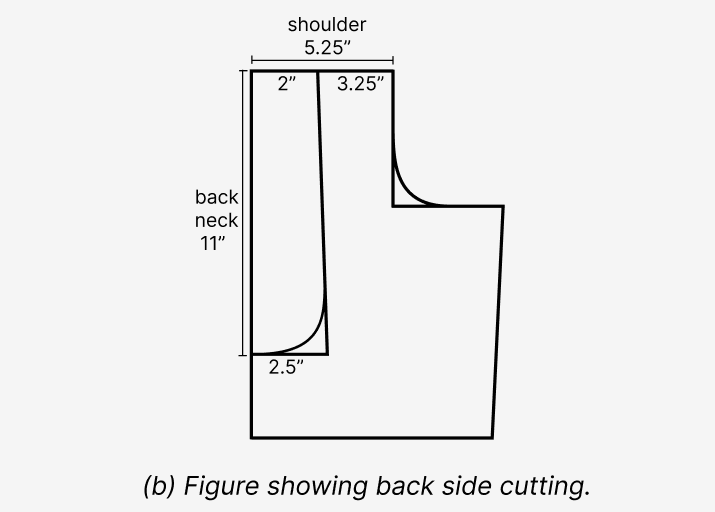
- Now cut the armhole of the back side and cut the folded part of the paper, by that, you will get your back side of the blouse.
- Draw a back neck of 11″ in it, if the width of the neck at the back neck is 2″ near the shoulder, then you can take 2.5-2.75″ below, as shown in figure(b).
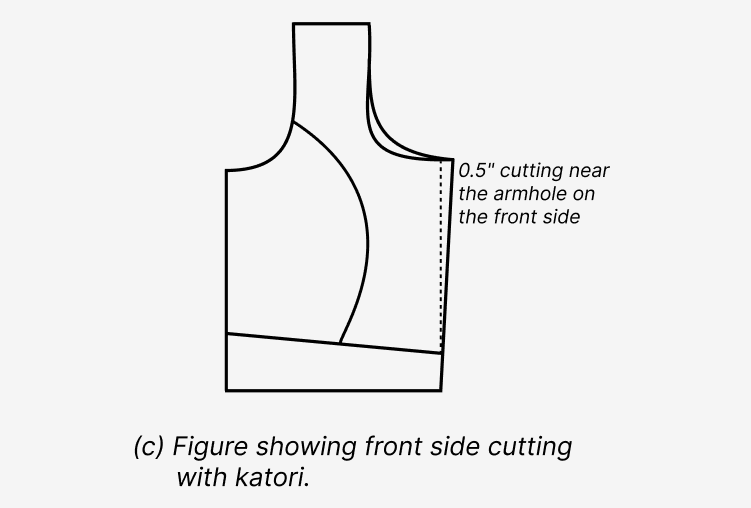
- After the back side cutting, now the front side will be made by cutting paper into three separate parts, referring to figure(c).
- In this way, if we make a 0.5″ cutting near the armhole on the front side, the side part will come out perfect, as in figure(c).
- Katori and yoke cutting is done again.
- The part of the yoke that has come out during cutting should be enlarged by 1″ at the bottom, as explained in figure(d).
- Make a yoke in another paper.
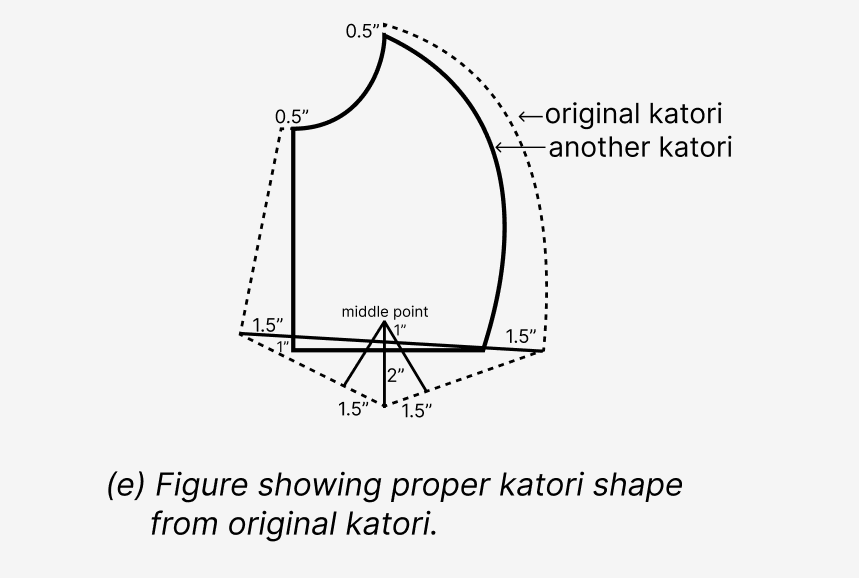
- After doing paper cutting of the katori, you have to do katori cutting in the proper katori shape like in the fabric cutting.
- So now we will do another paper cutting for the same katori in the proper katori shape.
- As explained in figure(e), place the second paper on top and add 0.5″ to the button strip side near the neck and 0.5″ to the curve.
- Then add 1.5″ to both ends.
- This measurement depends on the size of the katori, it can be increased by 1-2″.
- Take 1″ length less than the original katori on the button strip side.
- Now after increasing 1.5″ draw 1″ above the middle point and 2″ below it so that the lines on both sides are equal.
- Then draw tucks on both sides of 1.5″, as drawn in figure(e).
- Draw the tucks until they are 1″ above the middle point.
- Now katori is ready in the proper shape.
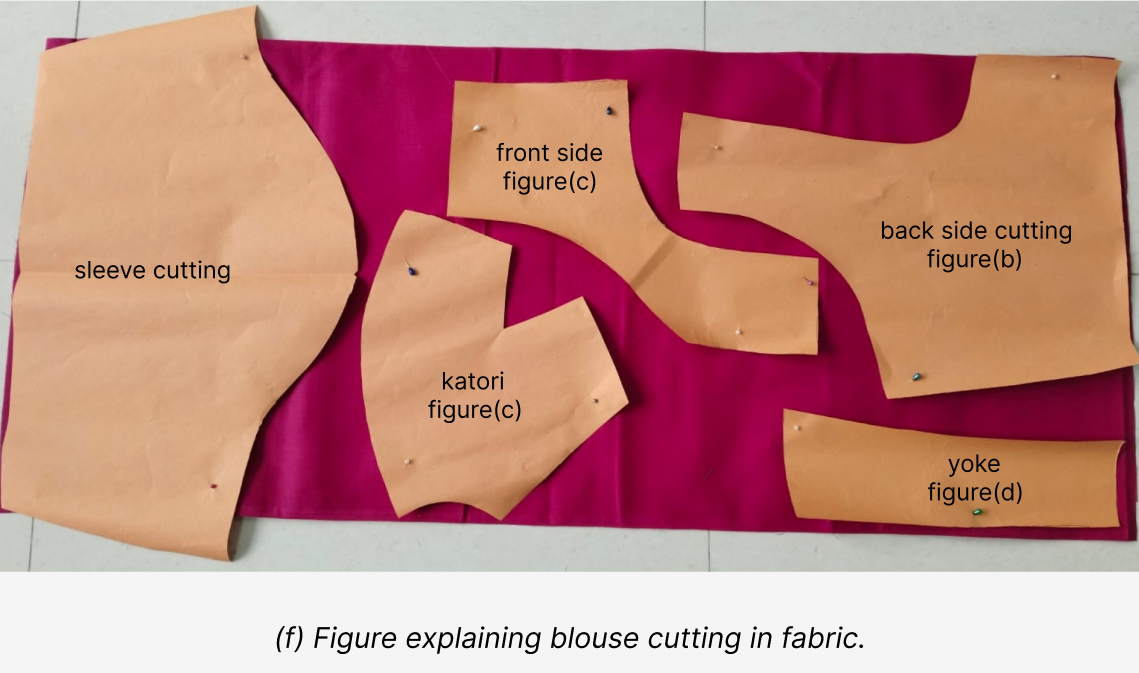
- The sleeve, back & front side must be kept in the vertical fabric.
- The yoke is to be placed horizontally on the fabric.
- And the katori has to be placed in a cross fabric.
Objectives:
- Mainly, the saree has the katori style blouse.
- In katori blouse, a deep neck blouse can be done.
- In all the blouses, the katori cut is done using the same method, but the shoulder and armhole are different according to the pattern and length of the back neck.
- The rules are also different with every different pattern.
Conclusion:
- I hope this method of katori blouse cutting method will help you in making the perfect blouse.
- If you have any doubts then feel free to contact us or you can also write in the comment section.


36 size boat neck blouse cutting pdf
You can learn from this : https://needlearthouse.com/crop-top-cutting-with-body-measurements
Thank you !!