Ladies’ Shirt – Cutting & Stitching
Once, we learned the regular kurti, kaftan style kurti, and the shrug.
In this session, we will learn the most stylish and most worn by ladies’ i.e. ladies’ shirt – cutting & stitching.
You must take 1.5-2m of fabric to make the ladies’ shirt.
Cotton fabric or soft fabric like chiffon is used for making the shirt.
Also, if you want to make a party wear shirt then you may take the transparent or net fabric.
Required Measurements For Shirt Cutting Method:
Here is the method to take body measurements.
- Length – measure from shoulder to seat and according to your choice
- Shoulder – measure from the back side from left to right covering the whole shoulder
- Chest – measure from the top of the breast in a round
- Waist – measure should be taken around the waist
- Seat – measurement should be taken around the hips
- Sleeve Length – measure from the shoulder in the hand till the length is to be kept
- Sleeve Round(mori) – take a hand measurement in the round where the length of the sleeve is reached
Method:
- To cut the shirt, keep the fabric in 2 folds and cut the back side first.
Steps with the figure:
CUTTING METHOD
- Now after taking the updated measurement take a sample of any measurement to know how much more fabric to cut for sewing.
- Length: 33″
- Shoulder: 16″
- Chest: 36″
- Waist: 32″
- Seat: 40″
- Sleeve length: 16″
- Sleeve round(mori): 5″
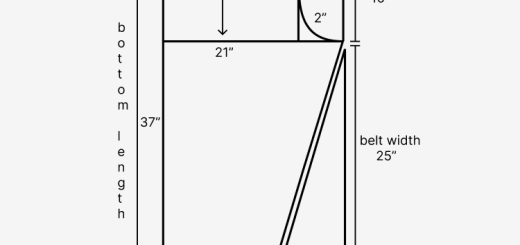
- First, add 1.5″ to the length measurement of the kurti.
- Total length = 33″+1.5″
- After that for shoulder measurement, take half of the shoulder and add 0.5″ from the folded side, reference in figure(a).
- Shoulder = 16″/2 = 8″+0.5″ = 8.5″
- To draw the part of the chest, waist, and seat by taking the armhole.
- For armhole measurement, take 1/4 of the chest and deduct 2 from that.
- Armhole = 36″/4 = 9″-2 = 7″
- Keeping the front neck length at 3.5″.
- For the front side neck width, we will take 1/12 of the chest.
- Neck width = 36″/12 = 3″
- For the back side, the neck width is considered 0.5″ to stitch with a shoulder.
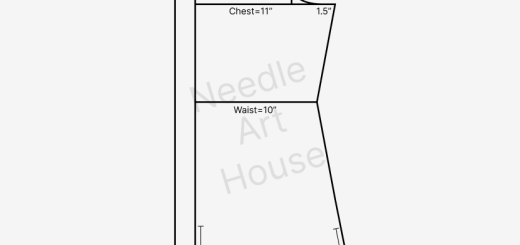
- As illustrated in figure(a), take the chest measurement where the line of the armhole touches, for measurement take 1/4 of the chest and add 2″.
- Chest = 36″/4 = 9″+2 = 11″
- Take the waist measurement 7 to 8″ below the chest, for that take 1/4 of the waist and then add 2″ to that.
- Waist = 32″/4 = 8″+2 = 10″
- For seat measurement, take 1/4 of the seat and add 1″ to where the height of the cut from the top reaches the seat.
- Seat = 40″/4 = 10″+1 = 11″

- To cut the front side, take the open part of the button strip 1.5″ larger than the back side.
- For collar cutting, sleeve cutting should be done after jointing single or double collars as per measurement.
- The sleeve cutting method for the shirt is considered as we have already learned before.
STITCHING METHOD
- It is very simple and easy to stitch the shirt.
- To stitch the shirt, strip the button on the front side and then make the shoulder joint.
- When the shoulder is stitched, take the round measurement of the neck.
- Cuts can also be made near the side seat of the shirt.
- Make a little round cutting below and bend the bottom edge.
- By this method, the shirt is stitched.
SINGLE COLLAR
- To make a single collar in a shirt, take the round measurement of the neck.
- Let’s say, if the measurement of the neck is 15″, there is a cutting of 7.5″ in the fold, as shown in the below figure(b).
- Follow the figure and do cutting.

- After cutting the collar in this way, keep the fabric in the inner part and sew it up.
- Then joint one part of the collar with the shirt and fold the opposite part over it and stitch it, as referred to the figure(c) below.

Other Objectives:
- Shirts can be styled in an Indian look as well as in a Western look.
- Shirts can be worn in countless ways; on a jacket or sweater, slip into high-waisted jeans.
- Shirts can also be worn with straight pant, palazzo pant, or even with any skirt like an umbrella skirt or long skirt.
- These days shirts are also paired with dhoti pant for a creative look.
Conclusion:
- I hope this method of drafting the shirt will help you.
- In the next session, we will learn about the blazer(coat) collar.
- We will also learn about shirt (double collar) cutting method.


I do believe all of the ideas you have offered for your post. They’re really convincing and can definitely work. Nonetheless, the posts are very short for starters. May you please lengthen them a bit from next time? Thank you for the post.
Thank you for suggestion!! We will surely take care of that point.